For installing as a stand-alone distributor
HIGH PERFORMANCE DISTRIBUTOR
INSTALLATION INSTRUCTIONS
(Read installations before installation)
6000 HEI Distributors are a 1-wire hook up, designed to eliminates all the clutter.
NOTE: Bronze gears are available for use with aftermarket / retro-fit roller cams.
Step 1 – Unpack the distributor carefully and inspect it for possible shipping damage. Inspect again after removing the cap.
Step 2 – If the distributor to be replaced has not already been removed from the engine, remove its cap. Do not remove the plug wires at this time. Crank the engine slowly until the rotor blade aims at a fixed point on the engine or firewall. Note this point for future reference.
Step 3 – Find the connector in the wiring from the distributor to the ignition switch, and unplug it.
Step 4 – Loosen and remove the distributor hold-down bolt and clamp. Lift the old distributor out. If the engine had been running within the past few minutes, the distributor housing may be hot and coated with hot engine oil. Wrap a shop towel around the distributor to avoid burning your hands and dripping oil.
Step 5 – Lower the new distributor into position. The rotor should be aimed at the same fixed point as was the rotor of the old distributor, and the vacuum canister aligned with the reference mark. After the new distributor has been lowered into place, you may find that it hasn’t seated firmly against the support boss. This indicates that the lower end of the distributor shaft is not properly aligned with the oil pump drive rod. Do not attempt to force the distributor into position.
Step 6 – With the distributor properly seated, tighten the hold-down bolt just enough so that the distributor is held in place, but can still be rotated with a little effort. Again, make sure that the vacuum canister is aligned with the reference mark.
Step 7 – After all wires have been transferred, verify that the wire in the terminal post that is aligned with the rotor leads to number one cylinder. If you are unsure of cylinder number position or firing order, this information can be found in the service manual that covers your particular engine. Put on the distributor cap.
Step 8 – Reconnect the wiring leading from the distributor from the ignition switch 12v. This is a simple 1 wire hook up.
Step 9 – Connect a timing light. Start the engine and allow it to warm up sufficiently to idle smoothly. It may be necessary to rotate the distributor (either clockwise or counter-clockwise) before a smooth idle can be achieved. If the engine will not idle smoothly, the firing order may be incorrect or the rotor may not have been properly aligned during installation. Consult a service manual for corrective procedures.
Step 10 – Consult the appropriate service manual to determine the factory-recommended initial timing and idle speed. Set initial spark timing with the vacuum advance line disconnected and plugged. Advancing timing two to four degrees from the factory setting beyond factory specifications may result in detonation, which can cause engine damage. Listen carefully – if you hear the engine knocking or pinging, retard initial timing as required to eliminate it.

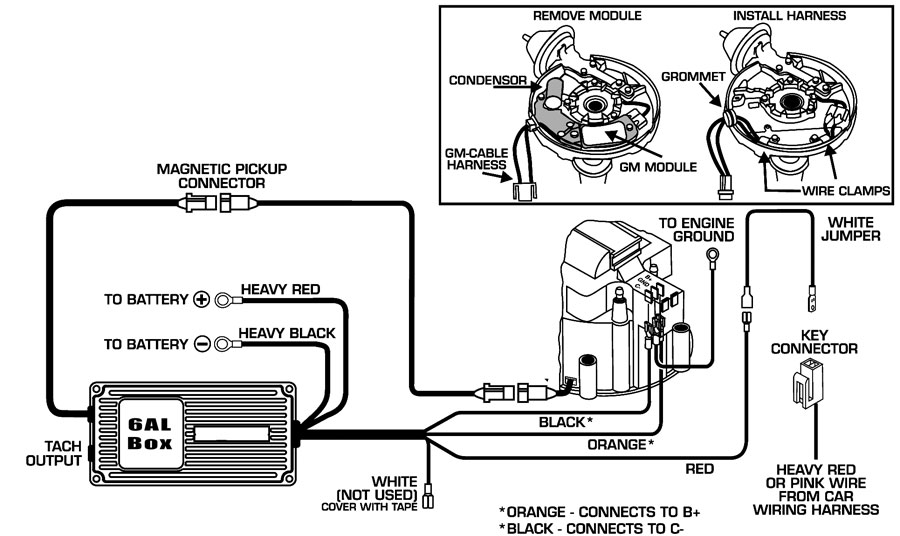
(MSD / Mallory / etc...)
Remove the factory module and condenser/pigtail. Replace with wires (or available adaptor) to plug into the magnetic-pickup input on the spark control box.